Wednesday 28 August 2013

Battle of Lützen, Fictitious Second Day, 3rd May 1813

Just Four Full-on Turns
This game of a second day of battle at Lützen used as a starting point the positions and status of the two armies at the end of our bicentennial re-fight of that battle.
We separated the troops by at least 7" and allowed re-deployment of non-frontline divisions, according to the house rules that we'd written for our game of Fuentes de Oñoro (described in our previous post about the re-fight of Lützen).
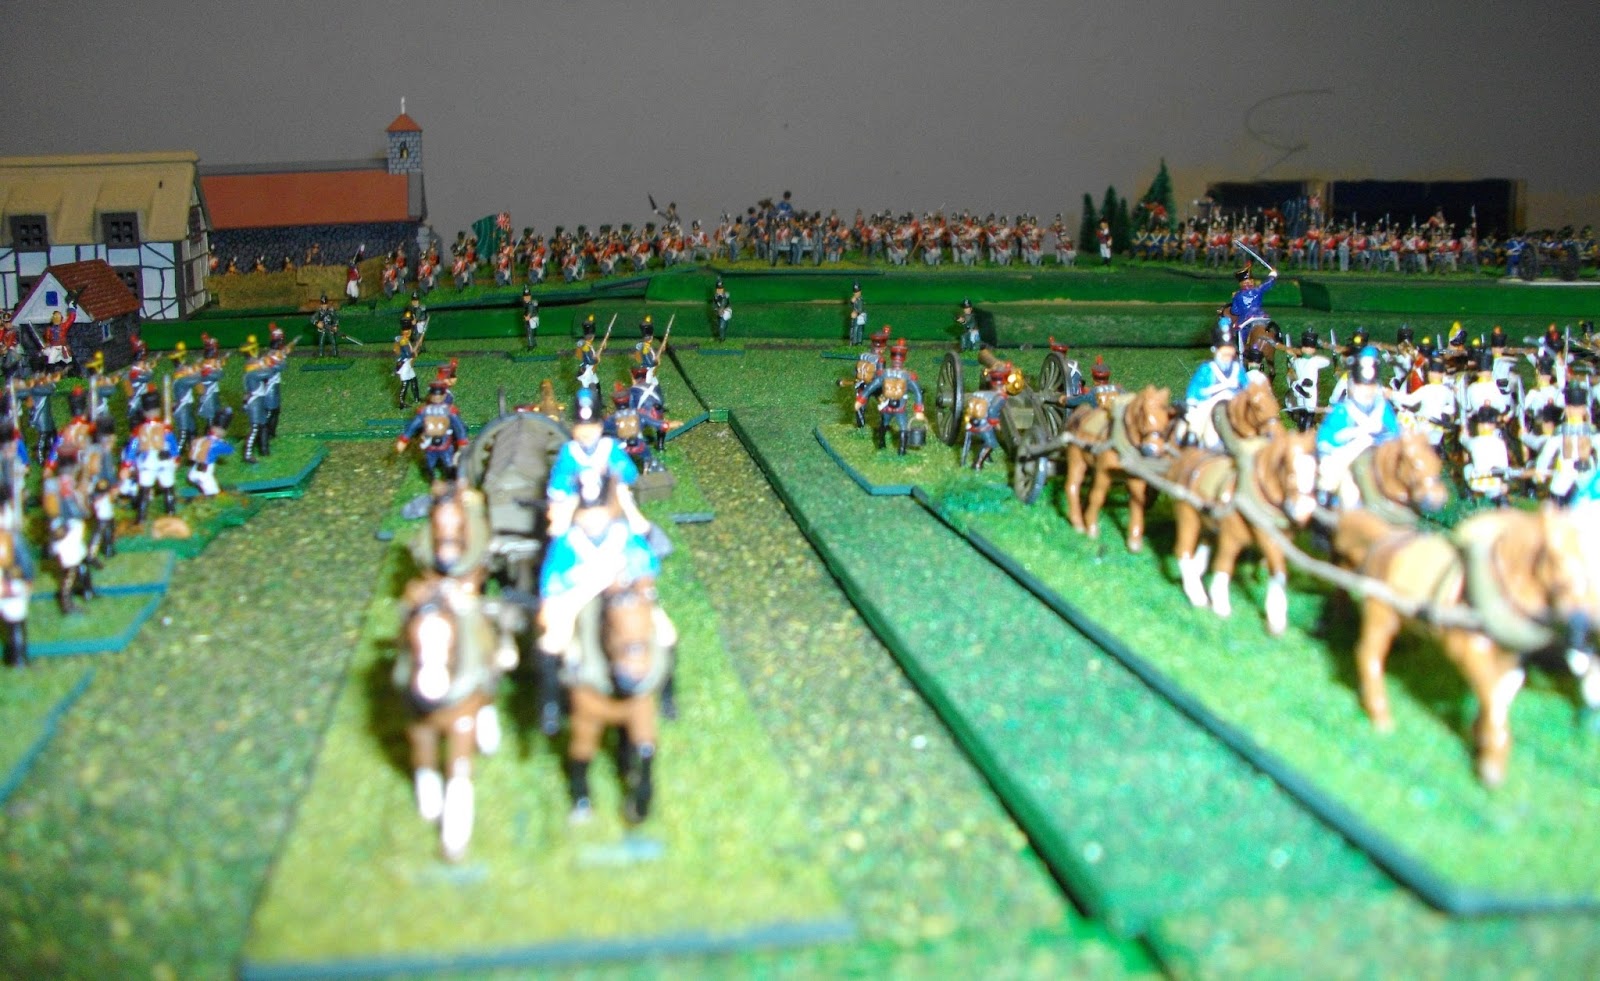
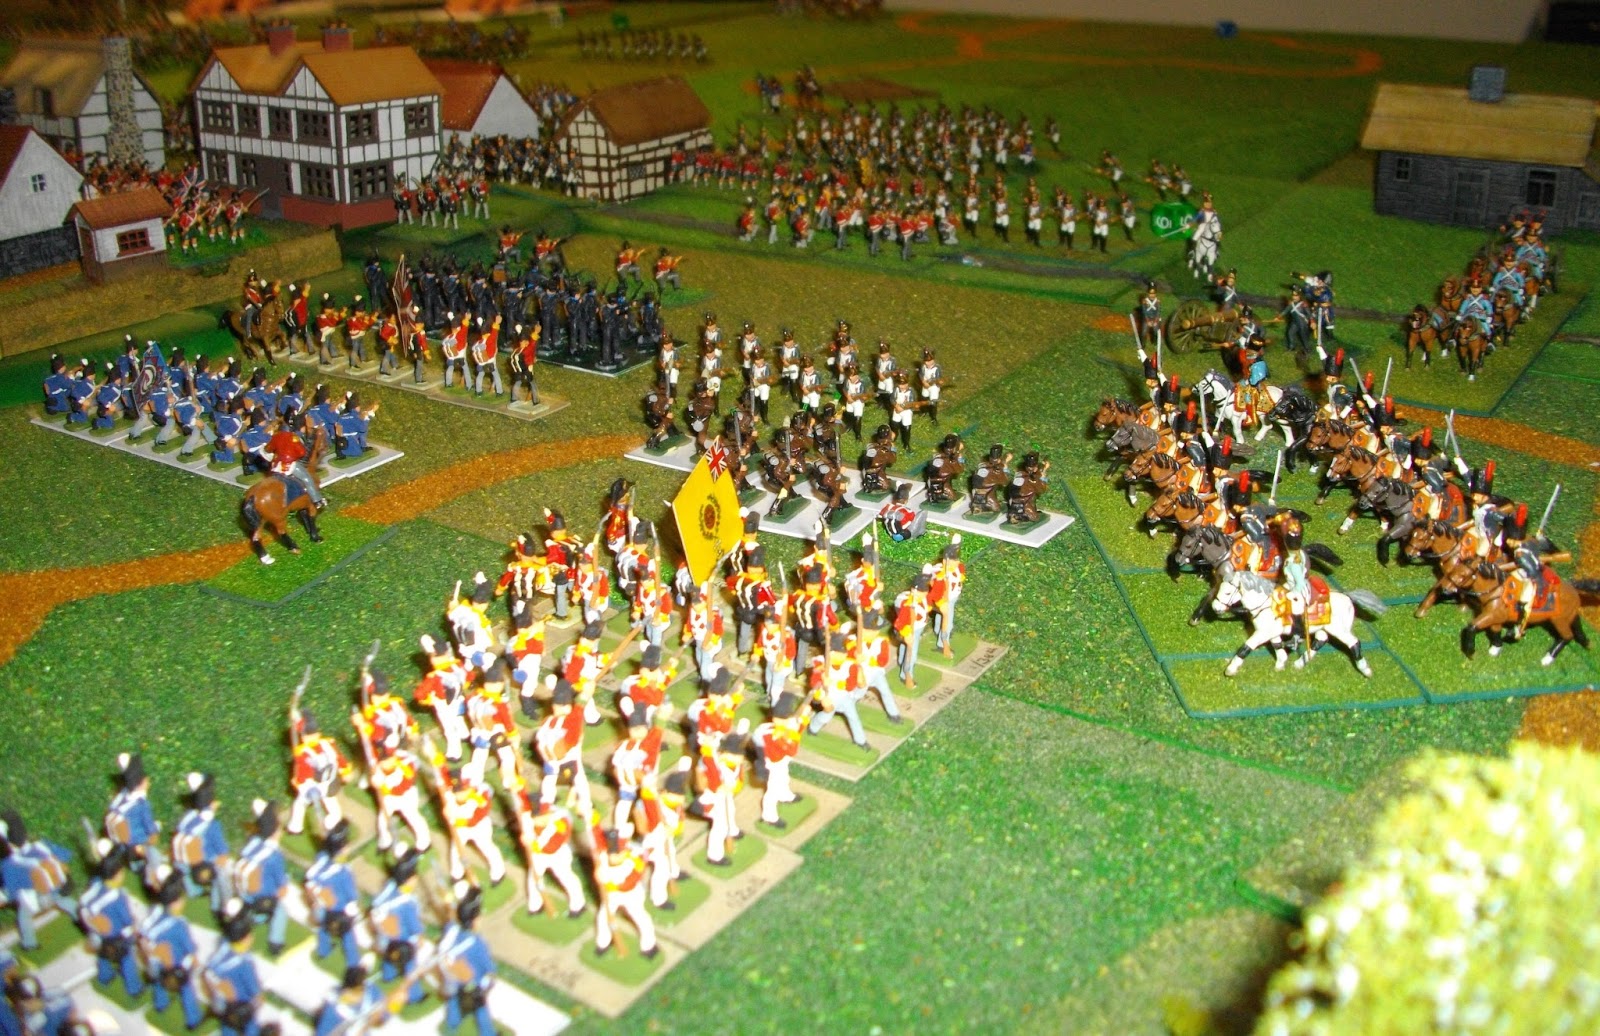
Below are two photos of the armies at the start of the game, the top one viewed from the west and the bottom one from the south-west. Note the proximity and density of the opposing forces. It was gonna get ugly early.


Mark redeployed the Russian guard light cavalry to the 'eastern' sector, a move that was to bear big dividends, beginning with forcing Gérard's leading infantry to be deployed in square.

With a limited frontage, I could only make small changes to the French-Allied distributions. I put the four weak cavalry divisions of Latour Maubourg's cavalry reserve in two columns to the left (roughly north) of Marmont's infantry and put the guard cavalry behind Morand's division (Betrand's corps) while moving Peyri's division of the same corps to the west of Starsiedel, as a general reserve.


Turn 1


Wittgenstein moved the Russian 1st Cuirassier Division to a position north-east of Gross Görschen to support the attack of the foot grenadier divisions.

Wittgenstein surveyed the Russo-Prussian attacks from his command post on Monarch’s Hill (above and below) and thought that it looked good.
The French-Allied army also attacked along the line (top of photo).

Turn 2
Play was temporarily suspended to admire a beautiful, complete rainbow outside ANF HQ. A good omen for the superstitious, but good for whom?


The god-fearing on the French side thought that they had their answer when the 1&2/139e ligne from Morand's division (Bertrand's corps) beat off a charge by the Prussian Silesian cuirassiers (die roll 6 vs 1)!


From west to east across the battlefield at the end of Turn 2...
Morand’s division advanced in square in the face of the overwhelming Prussian and Russian cavalry.
The first attack of the Young Guard was unsuccessful against the 1st East Prussia Infantry Regiment (centre), while the Prussian guards continued their relentless attack on Friederichs’ division (centre-left).
The initial attacks viewed from Monarch’s Hill.
Schachafsky’s Russians attacked Gérard's men in square.
Turn 3
In the west, with Girard’s division (Ney's corps) having finally been broken, the way was clear for a successful charge by the Prussian Guard Light Cavalry, which broke two units of Franquemont’s Württembergers, although leaving them open to a counter-attack from the 2nd Neapolitan chasseurs à cheval...
supported by the Guard cavalry.
Successes for both sides. The Young Guard against von Hünerbein’s brigade of Yorck’s II Prussian Corps (right); while von Röder’s Prussian Guard continued their winning ways, finally breaking Friederichs’ division (centre); and Doumerc’s dragoon division of Latour-Maubourg’s reserve cavalry broke the remnants of von Pirch I’s brigade, breaking through to the lead units of von Steinmetz’s brigade (top left).
In the east, Gérard's division (MacDonald's corps) was broken by the combined attack of the Russian Guard Light Cavalry and Schachafsky’s infantry...

leaving the French-Allied left greatly weakened...


before the attack of the combined Russian 1st Cuirassier Division and foot grenadier divisions.

Turn 4
Konovnizin’s grenadiers attacked the infantry of Charpentier’s division and Marchand’s ‘German’ division (forced into square by the Russian cuirassiers), while the horsemen turned to face Latour-Maubourg’s French cavalry.
Back in the centre, the Young Guard with Bonnet and Compans’ divisions of Marmont’s corps were getting the upper hand against Yorck’s Prussians, but the Prussian Guard continued to press against their left flank (top of photo), plus...
the Russo-Prussian cavalry abounded on the French-Allied right...
and Lavrov’s 1st and 2nd Russian Guard divisions stood in reserve around Rahna.
In the east, the Russians were in complete control, although Ledru des Essarts’ division of MacDonald’s corps continued to defend in Eisdorf...
lead by the Neapolitan élite regiment.
Next three photos: Charpentier’s and Marchand’s divisions just managed to resist the Russian onslaught.


The French-Allied centre-right was also facing increasing pressure...

as the Imperial Guard cavalry launched their attack.
Looking across the table from east to west:


Game Completed
We called the game as a clear Russo-Prussian victory at the end of Turn 4. There was no way that the French-Allied army could breakthrough at this point.
Both armies had suffered a lot of damage, but the French-Allied army had suffered more. Over the two days of battle (historical re-fight and this fictitious second day) the losses in morale rating of broken divisions was 197 from a total of 584 (33.7%) for the French-Allied and 119 from a total of 490 (24.3%) for the Russo-Prussian.
Stepping back and looking at the entire collection of photos  from the three days of gaming, it became obvious to me what some of my main mistakes were. My first mistake was in the second part of the re-fight of the historical battle. Rather than attack to my left, towards Kaja to link with Ney's troops while sending only a portion of my force towards Starsiedel, I attacked more or less straight ahead to support Girard, thus limiting my area for deployment and, most importantly, playing into my opponents hands by putting myself in front of the Russo-Prussian cavalry and, worse still, splitting my army. I then repeated the error in this fictitious second day of battle.
Of course, success would not have been guaranteed had I counter-attacked the other way but, failure was guaranteed the way that I went!
This is not to down-play the good tactics of the Russo-Prussians (Mark and Julian) who attacked aggressively from the outset. Particularly impressive was Julian’s aggressive use of the Prussian Guard, “surely their finest hour,” he said!
We had Stephen and Peter join us for this game. It was great to have them along as it makes managing such a large game much easier when we have more players. Stephen did particularly well at the eastern end of the battlefield.
The next game in our bicentennial ‘series‘ is Bautzen.


Massed Russian grenadiers and cuirassiers; marvellous!


Saturday 24 August 2013

Guest Blogger (2): Battle of Salamanca 22nd July 1812

We are pleased to present another post from our guest blogger, Phil from York, UK.

You may recall that Phil wargames principally in 20 mm using 1/72nd plastic figures and many of his recent games have been re-fights of battles of the Napoleonic bicentennial years. This time he has described for us his game of the Battle of Salamanca, arguably Wellesley’s most greatest victory, showing more of his beautifully painted figures.

Enough from me, it's over to Phil.

------------------------------------------------------------------------------------------------------------------------------
As with Lützen, I played Salamanca on my 5’ x 8’-ish table in the loft using my adaptation of Volley & Bayonet rules with brigades represented by two stands of eight figures (three for cavalry). I compiled the army lists for the game using the one in the Volley and Bayonet rulebook cross referenced with the Osprey Campaign Series book and anything else that I could find. The buildings are a mix of commercial items with some that I scratch-built by putting Wills plasticard rooves and windows on blocks of wood and plastering with poly-filler.

This was a quite a short game. The French on the allied right broke - Le Marchant went in and that was pretty much it - played out almost exactly like the original battle (perils of solo gaming?).

Below are a few photos from the early stages of the game.

Mistakenly thinking that the Anglo-Portuguese army was in retreat, Marmont sent his Army of Portugual to cut them off, only to place them flank-on and strung out across their opponent’s front. Here we see the French army with Thomières’ Division in the lead.

Leith’s 5th Division stand ready to exploit the French Marshal’s fatal mistake.

Campbell’s 1st Division poised to split the French army as it crosses the bridge over the Algabete River.

Suddenly aware of the threat to their flank, Thomières’ men turn to face the British line.

Dragoons of Le Marchant’s brigade await the order to charge.

Spry’s brigade of Leith’s 5th Division,

...prepare to attack from their position behind the village of Arapiles.

Sanchez’s lancers (Irregular Miniatures Spanish Civil War Republican cavalry).

Portuguese dragoons (a conversion from Revell’s British Guard cavalry).

Close up view of the 1e ligne from Thomières’ brigade.

Campbell’s brigade of guards advance to the attack.

References

Frank Chadwick, F & Novak, G (1994) Volley & Bayonet. Game Designers' Workshop. see Volley & Bayonet Publications Website.

Fletcher, I and Younghusband, B (1997) Salamanca 1812: Wellington Crushes Marmont. Campaign 48 (Eds L Johnson and D Chandler). Osprey Publishing, Oxford, England. 1st edition. 96 pp.

Thursday 22 August 2013

Catching Up On Past Games (6): Fuentes de Oñoro, 3rd–5th May 1811—Version 2

A Terrible, Wonderful Thing
(14th ANF game, played 4th & 11th September 2011)

We played our scenario of Fuentes de Oñoro a second time in the ANF ‘session’ immediately following completion of the first game of the battle, this time the three of us were present. Mark once again took the British and I played sub-commander to Julian’s Massena so that he could try a new strategy. Julian had been absent when we played the first version, which was one of the chief reasons that we decided to play it a second time.

Day 1, 3rd May 1811

The set-up viewed from the north. On the Anglo-Portuguese side Erskine's division closest to camera, then Campbell's and Picton's divisions north of Fuentes de Oñoro. On the French side Reynier's and Junot's corps (closest to camera) with the three divisions of Loison's corps in the distance. Barbacena's giant killing cavalry (from version 1) is just visible in the foreground.
Close-up of Reynier's corps with Heudelet's division closest to camera and Merle's adjacent to it.
At 13:00 the French attack began. Here we see Reynier's and Junot's corps (left to right Heudelet, Merle, Solignac) attacking Erskine and Campbell, focussing particularly on the former. Over the next two hours the opposing skirmishers exchanged fire and those from Erskine's division were dispersed. Heudelet's and Solignac's troops suffered casualties in the approach and some of Heudelet's skirmishers were dispersed.

Loison's division moved to attack Fuentes de Oñoro, suffering casualties in the approach.

By 16:00 the fighting in the north had become close and vigorous. Heudelet's lead units (17e légère and 70e ligne) attacked the 1st Foot (represented by a unit with yellow facings) who stopped them with an effective volley,

... the 1st counter-charged, but were beaten back by the French units and retired.

Reynier and Junot's attack came on strongly (here viewed from behind Erskine's line).

In contrast, Loison's attack was more of a demonstration before the strong position of Spencer's division in and around Fuentes de Oñoro, but did not prevent the 69e ligne being broken by artillery fire.

The 9th Foot counter-attacked the attack from Heudelet's infantry and pushed them back (rear of photo) but the British 38th Foot was broken and Erskine's battery overrun.

The 1/86e ligne from Solignac's division were pushed back by the 30th Foot (this time represented with yellow facings; unlike in version 1), the French rallied, but the staff officer who was with them was captured.

The second battery from Erskine's division was overrun by the 2e légère from Merle's division. Heudelet's division was broken having lost six out of eight battalions. Junot’s corps pushed further onto the ridge (centre of photo), breaking the 8th Portuguese from Campbell's division.

Above and below: while Loison's division exchanged fire with Spencer's defenders in Fuentes de Oñoro, Marchand’s division was ordered to attack to the south of the town, supported by Lamotte's light cavalry and horse artillery.

As with the first version, the 1/Colstream guards stood tall in defence.

The French formed a grand battery to the north of Loison's corps.

In a move counter to history, Montbrun's cavalry were sent to the northern flank.

Day 1 Summary

While Loison made a demonstration in front of Fuentes de Oñoro, Reynier and Junot attacked Erskine's division aggressively on the ridge on the British left flank. Heudelet's division lead the attack which by day's end had driven in the British line, but at what cost?

Reorganisation 4th May 1811

‘Massena’ and ‘Loison’ conferred during the ‘rest day’. The C-in-C was not confident, but Loison suggested that they attack all along the 'line'. In game terms there were five or so hours (turns) before the ammo supply rules cut in. "Perhaps if we pressured the Anglo-Portugese line everywhere we could break through?" The problem was that there were no reserves to throw in to exploit any weakness, save for the Guard cavalry and that may not become ‘available’.

Massena agreed and decided to throw everything at the Anglo-Portuguese centre and left. Montbrun had already been sent to the north and was ordered to attack around the right flank of Reynier's troops (Merle's division) and then south to the enemy centre. D'Erlon's newly arrived corps was sent to attack the Anglo-Portuguese centre, north of Fuentes de Oñoro. Mermet's and Loison's own division from his corps were to increase their efforts against Fuentes de Oñoro, while Marchand attacked around the south of the town, supported by Lamotte's cavalry and perhaps that of the Guard; if they could be encouraged to join the battle. In short, a concerted and vigorous attack against centre, left and right.

For his part Wellesley was confident in the strength of his position and the resilience of his men. He sent Craufurd with the light division to support the left-centre and would use Cotton's cavalry to harass the French on his right (south).

Above and below, views of the battlefield from the north and south-east after the 'rest day'. The opposing troops began just 7" apart.

Above and below, the Anglo-Portuguese defence in and north of Fuentes de Oñoro; calm and confident.

Wellesley directs the defence from his command post. Note the captured French staff officer who is taking bets on the outcome with Sir Edward Paget.

Day 2, 5th May 1811

The opening artillery bombardment was destructive on both sides. As planned, the French attacked along entire front.

Above and below: Cotton's light dragoons charged Lamotte's light cavalry. The French hussars broke one British regiment and then broke through and forced a second to retreat. However the French horsemen were now blown and exposed.

Massena sent aides in search of Béssières to get his imprimatur to send orders to the Guard cavalry. Béssières was found but refused to send the Guard into combat; for now...

Mermet's division faced off Spencer's defenders while Marchand's division attacked around to the south of the town.

Solignac (closest) and Merle renew the attack that had been suspended since the 3rd.

Slade's 1st Dragoons (Cotton's cavalry) easily disposed of Lamotte's blown hussars and and followed on to break the 2/6e légère of Marchand's division.

Claparede's columns (d'Erlon's corps) attacked Campbell's division. The 21e légère (right of photo) were stopped by fire and broken by charge of counter-charging 61st Foot.

The 15e ligne from Solignac' division exchanged fire with the British line (top left of photo). The French came off second best and broke, taking the entire division with them.

Houston's 7th Division (foreground) moved to support the Anglo-Portuguese right.

The 09:00 turn saw mêlées along the entire line.

The advance of Slade's cavalry 'activated' the Guard cavalry which moved to support Marchand (rear of photo). 

Further north, Claparede's division was making headway onto the ridge.

In the far north, Montbrun's dragoons reached the ridge, broke Barbacena's Portuguese dragoons, put the independent Portuguese brigade into square and moved to threaten the flank of Erskine's division.

Overview of the battlefield from the north. The French were exerting pressure everywhere, especially the centre, but the Anglo-Portuguese line was holding.

Marchand's 39e ligne entered Fuentes de Oñoro and drove back a battalion of highlanders,

...while the rest of his division advanced on Spencer's troops stationed outside of the town.

View of the battlefield from the north, showing the gap left by Erskine's broken division.

In the south, the Empress Dragoons broke the 1st Dragoons of Cotton's division and then charged on to the KGL hussars and were beaten and themselves broke! In the command phase Cotton's division retreated and Lepic (Guard cavalry) also failed morale and were demoralised! Campbell's division passed at 1/3 losses.


View from the south west, showing Houston's 7th Division ready in support and, tellingly, the gap left north of Fuentes de Oñoro due to the retreat of Picton's Division which had suffered from the sustained bombardment of the French grand battery.

Spencer was still in control of Fuentes de Oñoro, but the pressure was mounting.

French attacks continued all along the line. Mermet's division exchanged more volley's with the 1/Colstream, coming off second best.

Marchand's division was making progress into Fuentes de Oñoro.
Picton's, Erskine's and Cotton's had divisions failed to rally.

Marchand's division and the Grenadiers à cheval combined to attack Houston's division.

The British Guards finally broken, Mermet's division entered Fuentes de Oñoro.

Montbrun's dragoons caught the 43rd Foot out of square...

while Fournier's chasseurs à cheval dispersed the 95th's skirmish line.

(**The legitimacy of this movement of the French cavalry along the ridge is something that we have pondered, off and on, since this game)

Campbell's division was close to 1/2 losses.
All French divisions were low on ammunition.


Above and below: Mermet's division was taking control of Fuentes de Oñoro. Campbell's division was broken.

Craufurd's division retreated and the ridge was devoid of defenders; Wellesley's needed to move his command post.

The Grenadiers à Cheval and infantry from Marchand's division charged a square of Houston's infantry and were repulsed. Marchand's division was demoralised.

The French grand battery was in command of the centre of the battlefield. Marchand's division rallied and so was no longer demoralised. Spencer's division, just hung onto the western edge of Fuentes de Oñoro by passing morale at 1/2 casualties.

The tabletop at the end of the game showing how depleted both sides were, especially compared with the beginning of the second day of battle which is shown again below.
Was it Albuera?
The second version of Fuentes de Oñoro left many plastic widows to mourn their loved-ones and the three human players feeling somewhat dazzed. The Anglo-Portuguese army was battered and the French unable to celebrate such a phyrric victory.


Victory points 

The French received 1 victory point for Nave de Haver, 18 victory points for the broken Anglo-Portuguese 'divisions' and 2 points for Craufurd's retreated division. The Anglo-Portuguese received 18 points for broken French divisions. The difference was 3 points giving a minor French victory.

The French had 102 points of MR lost from 260 (39%) while the Anglo-Portuguese has lost  99 points of MR(40%).

It had been an intense and hard-fought affair.